

-
Menu
- Language
- Currency : US $USD
- $ United States Dollar USD
- £ British Pound GBP
- € Euro EUR
- $ Australian Dollar AUD
- $ Canadian Dollar CAD
- $ New Zealand Dollar NZD
- kr Swedish Krona SEK
- $ Singapore Dollar SGD
- kr. Danish Kroner DKK
- Руб. Russian Ruble RUB
- Rs. Indian Rupee INR
- ¥Japanese Yen JPY
- $ Mexican Peso MXN
- kč Czech Koruna CZK
- ft Hungarian Forint HUF
- zł Polish Zloty PLN
- R. South African Rand
- rm Malaysian Ringgit MYR
- $ Hong Kong Dollar HKD
- ₣ Swiss Franc CHF
- All Categories
- Recent Trends
- Learning Center
- Search
- My Account
- Cart 0
How to make a jewelry stand with cheese grater
Summary: Our new tutorial about how to make a jewelry stand is going to display a simple way to make out a feasible jewelry stand out of used stuff such as cheese grater.
Date : Sep 11, 2012
Have you ever imagined making a jewelry stand with a used cheese grater? If someone else as ked you the question: How to make a jewelry stand with cheese grater, would you recognize it a joke? Some of amateur jewelry makers have come up with the idea and put it into practice. So the facts have proved that making jewelry with cheese grater is not a fantastic fun but a critical creation.
I suppose it is a quick, easy craft for your leisure time, especially for some of your summer holiday. It is excellent time to learn something about beading jewelry, tips and other related jewelry making. The finished jewelry stand not only functions well, but also looks pretty, and the instructions of jewelry stand making leave much room for creativity and change. The followings are step-by-step instructions on How to make a jewelry stand out of a cheese grater.
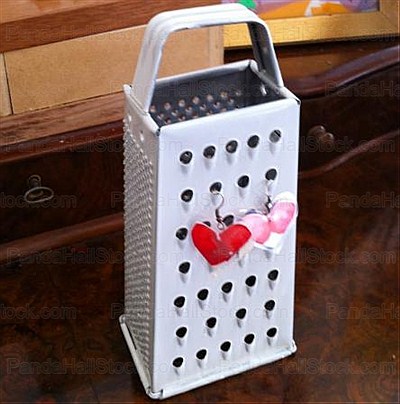
How to make a jewelry stand step 1: get cheese grater prepared.
Buy a cheese grater. Graters can be bought in cheap price at a second hand store or flea market. You may have an extra one lying around. Another way is to take out the used cheese grater, if your family household storage gets one. It is much cheaper; you see you needn’t pay anything.
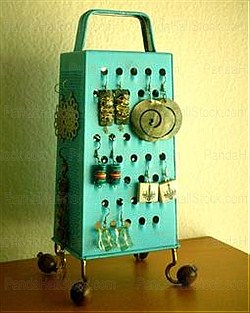
How to make a jewelry stand step 2: Choose your color scheme and patterns
This is where creativity comes in, your style and artisan design can be shown completely in this step. Some designers like those bright, contrasting colors for a more modern, and funny look. However, you can also pick a more rustic look with browns, sandy yellows and greys or come up with an all new idea. For example, the jewelry stand makers who like mature and attractive style would use leopard spots; while others who are accustomed to young and lovely style, would pick strawberry, star or heart patterns. So you can paint accordingly.
How to make a jewelry stand step 3: Paint your cheese grater
You must do your best to paint a solid color as your first coat. Then on the basis of a color base, you could leave the handles empty for another unusual color or patterns. In a word, exerting your full imagination and creativity to design the paintings on your cheese grater. Wait until the paint gets dried. Then you can put on it all of your jewelry.
Our tutorial about How to make a jewelry stand is done. As you can see the instruction, only 3 steps you can finish your jewelry stand. Enjoy your making!
Tag : jewelry making


- Shop
- Jewelry Beads
- Jewelry Findings
- Beading Supplies
- Stringing Materials
- Jewelry & Watches
- Sewing & DIY Crafts
- Beauty & Personal Care
- Office & Home & Garden
- Information
- About Us
- Discount Policy
- Payment Info
- Contact Us
- Sitemap
- Customer Service
- Terms & Conditions
- Privacy Policy
- Return Policy
- Shipping & Delivery
- Customs & Duties
- How to Order
- Help & FAQ
![]()

Newsletter
Sign up to Nbeads news

©2011 - Thu Apr 25 04:20:17 PDT 2024 Nbeads.com All Rights Reserved.

Search by Image
Search Nbeads with an image instead of text. Try dragging an image here.
- Upload an image
- Paste image URL
1. The image must be in one of the following formats: .jpg, .png, .jpeg, .bmp, .gif, .webp, .tiff, .ppm
2. The size of the image should be less than 5M!
3. The image length and width must be greater than or equal 200 pixels and smaller than or equal to 1024pixes.
1. The image must be in one of the following formats: .jpg, .png, .jpeg, .bmp, .gif, .webp, .tiff, .ppm
2. The size of the image should be less than 5M!
3. The image length and width must be greater than or equal 200 pixels and smaller than or equal to 1024pixes.
Uploading File
